OpenFaaS on Windows Devbox
Posted on March 29, 2019 in Develop Updated: October 19, 2019
Running OpenFaas in Dev on Windows
Finally the time has arrived, when I'll start using OpenFaas.
I first heard about OpenFaaS at a meetup in May 2018, 6 Cloud Native Talks, 1 Evening: Special KubeCon + CloudNativeCon EU Meetup! by OpenFaaS creator, Alex Ellis.
Next I bought the book Docker for Serverless Applications (D4S) by Chanwit Kaewkasi, but only skimmed it. I highly recommed it!
Now it is time to practice.
Why? - OpenFaaS vs Cloud Native Serverless
- Why not just use cloud native serverless?
- When you don't want the auto-kill feature.
- When you want serverless in you dev box
- You don't get pay-per-invocation?
- No you have to deploy a #k8s or #docker_swarm cluster. This can be as cheap by using #spot_instance s. @chanwits teach you how to do that.
- You don't get seemless integration with cloud native services?
- No - but aren't you used to that when you integrate to the services from your dev box?
How?
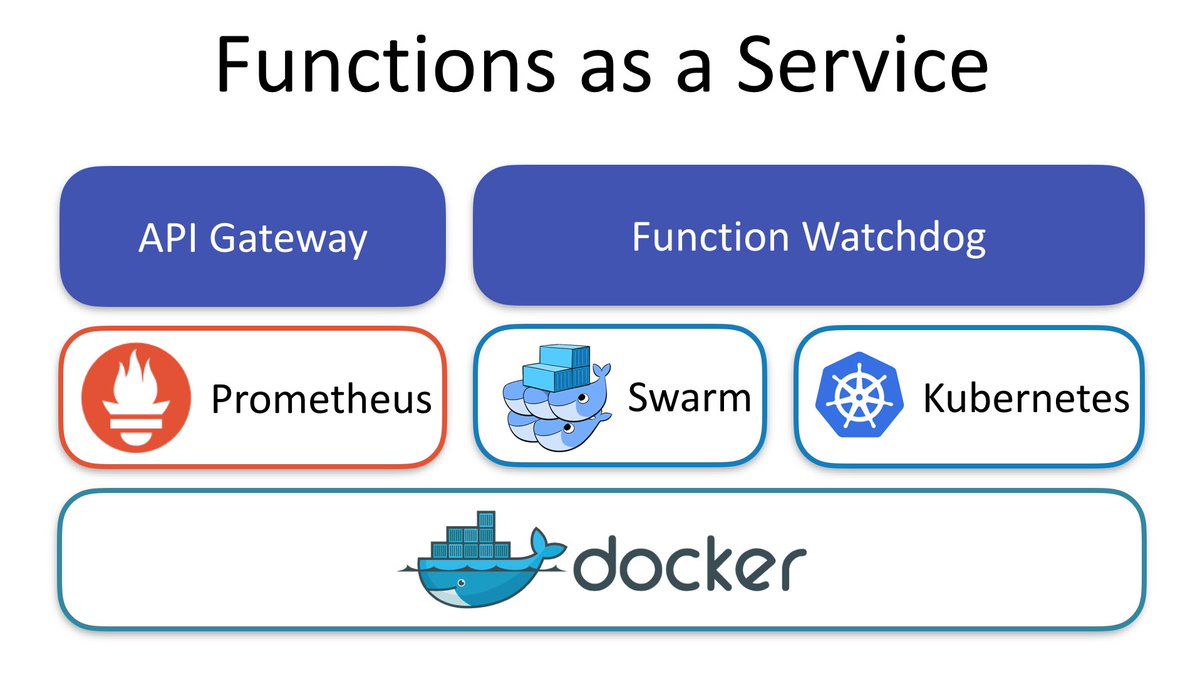
You can run OpenFaaS either on top of Kubernetes (k8s) or Docker Swarm.
Info: k8s or swarm gives you a cluster of machines, and deployed an application to it, with containers running in concert on multiple machines.
 (from OpenFaaS website).
It comes with autoscaling features, logging and prometheus.
Production
For deploying to OpenFaaS to a cloud container cluster there are some good guides on k8s like ofc-bootstrap. I guess you are managing the cluster here.
You can include the ofc-bootstrap in a GitLab DevOps workflow. This will use DigitalOcean (60 day trial in previous link), Google Cloud or AWS as cloud container cluster provider.
There is also a great guide in the D4S book chapter 7, where Chanwit uses AWS spot instances for running Swarm worker nodes. This solution can keep the price as low as Native Serverless, Chanwit claims. The challenge with spot instances is that you have to restart nodes, when they are marked for termination.
In this guide you are managing the cluster.
Chanwits code is here.
But OpenFaaS has build-in scaling and monitoring, so the managing part is limited.
Development
For local deployment there are guides, too.
- Swarm: Docker Swarm - OpenFaaS
- k8s: Kubernetes - OpenFaaS
- D4W + k8s: Run your own FaaS with OpenFaas and .Net Core
- In the D4S book chapter 4 teaches you to deploy OpenFaaS on Swarm.
Chanwits code is here.
Practice
I'll select Windows + Docker for Windows (D4W) + Hyper-V + Swarm.
On a Windows laptop you can run D4W on VirtualBox or Hyper-V hypervisor. I'll choose Hyper-V, since that was what I used previously. Using Kitematic you should be able to swap from Hyper-V to VirtualBox.
If you want to use VirtualBox you get it included with Kitematic in Docker Toolbox.
My reason for choosing Swarm is that I think it is easier to getting started with. In D4W kubernetes settings you can change from k8s to Swarm docker stack commands - this is configured in ~\.docker\config.json.
For a start I'll follow guide Docker Swarm - OpenFaaS
Pre-requisites
Here is what you need
- Git Bash
- Optional: cUrl
- Docker for Windows (D4W) - including Hyper-V
- Optional: Python
Examine Docker
As mentioned above - you need Docker for Windows either on top of Virtual Box or Hyper-V. I upgraded to latest - 2..0.0.3.
And my D4W settings is already set to Swarm.

# Verify Docker is running
docker info
# Containers: 4
#  Running: 0
#  Paused: 0
#  Stopped: 4
# Images: 15
# Server Version: 18.09.2
# Storage Driver: overlay2
#  Backing Filesystem: extfs
#  Supports d_type: true
#  Native Overlay Diff: true
# Logging Driver: json-file
# Cgroup Driver: cgroupfs
# Plugins:
#  Volume: local
#  Network: bridge host macvlan null overlay
#  Log: awslogs fluentd gcplogs gelf journald json-file local logentries splunk syslog
# Swarm: inactive <-----------
# Runtimes: runc
# Default Runtime: runc
# Init Binary: docker-init
# ....
Docker Swarm
You also need to log in to Docker Hub, so you can upload some docker images.

With docker running next we need a Swarm cluster - from docker init we know that Swarm is inactive.
How can you operate Swarm?
docker swarm
# Commands:
#   ca          Display and rotate the root CA
#   init        Initialize a swarm
#   join        Join a swarm as a node and/or manager
#   join-token  Manage join tokens
#   leave       Leave the swarm
#   unlock      Unlock swarm
#   unlock-key  Manage the unlock key
#   update      Update the swarm
Swarm has manager- and worker nodes. We only need the manager.
On a devbox we'll just create a single-node swarm. When creating multi-node swarms you should use command docker-machine.
# Create a single-node swarm.
# Create 1st manager node - you need to add --advertise-addr, if the host has a public IP addr.
docker swarm init
# Swarm initialized: current node (ornhp66bt5rk928ekryv4xks4) is now a manager.
# To add a worker to this swarm, run the following command:
#     docker swarm join --token SWMTKN-1-0rzaxpyyubb419j6qf9wubskxnypznknbaw5wiqcx05kt6ew1i-cje86tlt1s4fc69yy7cuwww0l 192.168.65.3:2377
# To add a manager to this swarm, run 'docker swarm join-token manager' and follow the instructions.

# If you don't note above worker-join info you can re-print it
docker swarm join-token worker
# To add a worker to this swarm, run the following command:
#     docker swarm join --token SWMTKN-1-0rzaxpyyubb419j6qf9wubskxnypznknbaw5wiqcx05kt6ew1i-cje86tlt1s4fc69yy7cuwww0l 192.168.65.3:2377

# Now swarm is active with this windows shell being the manager node - meaning - the manager is not running in a container
docker info
# ....
#  Log: awslogs fluentd gcplogs gelf journald json-file local logentries splunk syslog
# Swarm: active
#  NodeID: ornhp66bt5rk928ekryv4xks4
#  Is Manager: true
#  ClusterID: 9pvxm96yzehiadacxf7k0e87e
#  Managers: 1
#  Nodes: 1
#  Default Address Pool: 10.0.0.0/8
#  SubnetSize: 24
#  Orchestration:
#   Task History Retention Limit: 5
#  Raft:
#   Snapshot Interval: 10000
#   Number of Old Snapshots to Retain: 0
#   Heartbeat Tick: 1
#   Election Tick: 10
#  Dispatcher:
#   Heartbeat Period: 5 seconds
#  CA Configuration:
#   Expiry Duration: 3 months
#   Force Rotate: 0
#  Autolock Managers: false
#  Root Rotation In Progress: false
#  Node Address: 192.168.65.3
#  Manager Addresses:
#   192.168.65.3:2377
# Runtimes: runc
# ....

# print more info about the swarm node(s)
docker node ls
# ID                            HOSTNAME                STATUS              AVAILABILITY        MANAGER STATUS      ENGINE VERSION
# ornhp66bt5rk928ekryv4xks4 *   linuxkit-00155d102102   Ready               Active              Leader              18.09.2
Learn more about the Swarm clusters.
OpenFaaS
OpenFaaS Install
With a cluster running we can start OpenFaaS installation. This is done from a script that we fetch from github.
# Download docker-compose.yml file and deploy deploy_stack.ps1
cd C:\Users\yourname
# At time of writing the latest OpenFaaS release is https://github.com/openfaas/faas/tree/0.12.0
git clone https://github.com/openfaas/faas
cd faas
From Powershell prompt - run as admin - it will use a .NET dll for creating a password.
# Install OpenFaaS via ps1 - notice - it will create a user and password for logging in to the CLI
cd C:\Users\yourname\faas
Set-ExecutionPolicy RemoteSigned
./deploy_stack.ps1 # ./deploy_stack.sh for Linux or Mac
# Attempting to create credentials for gateway..
# [Credentials]
#  username: admin
#  password: b391be3c12d7dc8412a26eb13625f0d28bab2e578acb7473ea6c9e209e501f37
#  Write-Output "b391be3c12d7dc8412a26eb13625f0d28bab2e578acb7473ea6c9e209e501f37" | faas-cli login --username=admin --password-stdin
# Enabling basic authentication for gateway..

# Deploying OpenFaaS core services
# Creating network func_functions
# Creating config func_prometheus_rules
# Creating config func_alertmanager_config
# Creating config func_prometheus_config
# Creating service func_faas-swarm
# Creating service func_nats
# Creating service func_queue-worker
# Creating service func_prometheus
# Creating service func_alertmanager
# Creating service func_gateway

# Prints:
docker stack ls
# NAME                SERVICES            ORCHESTRATOR
# func                6                   Swarm

docker stack services func --format "table {{.Name}}\t{{.Ports}}"
# NAME                PORTS
# func_gateway        *:8080->8080/tcp
# func_faas-swarm
# func_queue-worker
# func_prometheus     *:9090->9090/tcp
# func_nats
# func_alertmanager
OpenFaaS Usage
OpenFaaS Portal
So you've got (as the print above shows you)
- OpenFaaS Portal on http://127.0.0.1:8080

- Prometheus on http://127.0.0.1:9090

Let's test OpenFaaS.
- Press Deploy New Function.
- Select Figlet and press Deploy.
- Notice there is a link to the code deployed: faas-and-furious/figlet

- Now test the function. Select it, enter an input string in Request body and invoke it.
- Output is displayed in Response body. Notice the invocation count telling it has been invoked once. And it only took 43ms to create its container, execute it and kill it again!

Let's test Prometheus.
- On the Graph page there is a dropdown list with a lot of counters. The first one is gateway_function_invocation_total. Select it and press Execute.
- Yes, also here we are told there has been one invocation, but we are even told name of function, where it was running and the http result status code.
- Notice you can get a graph view instead of this list view.

- There are lots of counters. Here is a screenshot of the top ones.

So how about invoking figlet from curl?
curl localhost:8080/function/figlet -d "OpenFaaS"
#   % Total    % Received % Xferd  Average Speed   Time    Time     Time  Current
#                                  Dload  Upload   Total   Spent    Left  Speed
# 100   290  100   282  100     8   5035    142 --:--:-- --:--:-- --:--:--  5272
#   ___                   _____           ____
#  / _ \ _ __   ___ _ __ |  ___|_ _  __ _/ ___|
# | | | | '_ \ / _ \ '_ \| |_ / _` |/ _` \___ \
# | |_| | |_) |  __/ | | |  _| (_| | (_| |___) |
#  \___/| .__/ \___|_| |_|_|  \__,_|\__,_|____/
#       |_|
Nice - we have a webservice then :-)
OpenFaaS CLI
For Windows you need to download OpenFaaS CLI - faas-cli.exe from openfaas/faas-cli/releases to e.g. C:\Program Files\Docker\Docker\Resources\bin\. In this way it will already be in the system path.
From GIT Bash - CLI Login does not work from CMD!
# Verify Faas CLI is responding
faas-cli version
# version: 0.8.6

# Login to OpenFaaS gateway
echo -n b391be3c12d7dc8412a26eb13625f0d28bab2e578acb7473ea6c9e209e501f37 | faas-cli login --username=admin --password-stdin
# Calling the OpenFaaS server to validate the credentials...
# WARNING! Communication is not secure, please consider using HTTPS. Letsencrypt.org offers free SSL/TLS certificates.
# credentials saved for admin http://127.0.0.1:8080
Info: faas-cli login will store your password as a hash at ~/.openfaas/config.yaml.
But when you open the OpenFaaS Portal at http://127.0.0.1:8080 you will also need the psw.
127.0.0.1 is the localhost IP. You can replace it with the internal (nat'ed) IP of your PC.
# What does the CLI give you?
faas-cli
# Available Commands:
#   build          Builds OpenFaaS function containers
#   cloud          OpenFaaS Cloud commands
#   deploy         Deploy OpenFaaS functions
#   describe       Describe an OpenFaaS function
#   generate       Generate Kubernetes CRD YAML file
#   help           Help about any command
#   invoke         Invoke an OpenFaaS function
#   list           List OpenFaaS functions
#   login          Log in to OpenFaaS gateway
#   logout         Log out from OpenFaaS gateway
#   new            Create a new template in the current folder with the name given as name
#   push           Push OpenFaaS functions to remote registry (Docker Hub)
#   remove         Remove deployed OpenFaaS functions
#   secret         OpenFaaS secret commands
#   store          OpenFaaS store commands
#   template       OpenFaaS template store and pull commands
#   up             Builds, pushes and deploys OpenFaaS function containers
#   version        Display the clients version information

# Flags:
#       --filter string   Wildcard to match with function names in YAML file
#   -h, --help            help for faas-cli
#       --regex string    Regex to match with function names in YAML file
#   -f, --yaml string     Path to YAML file describing function(s)


# Let's see what we have of functions
faas-cli list
# Function                        Invocations     Replicas
# figlet                          8               1

# Let's try to invoke it once more
echo "FaaS CLI" | faas-cli invoke figlet
#  _____           ____     ____ _     ___
# |  ___|_ _  __ _/ ___|   / ___| |   |_ _|
# | |_ / _` |/ _` \___ \  | |   | |    | |
# |  _| (_| | (_| |___) | | |___| |___ | |
# |_|  \__,_|\__,_|____/   \____|_____|___|
OpenFaaS CLI Build
Now we can build our own functions.
I need to run some Python functions, so I'll develop with python.
Here is a guide: Your first serverless Python function with OpenFaaS (Step 3 - Write your function)
# What Python versions do I have on this devbox?
# 2.x:
python -V
# Python 2.7.15
# (yes I know it is old)
pip -V
# pip 9.0.3 from c:\program files (x86)\python27\lib\site-packages (python 2.7)

# 3.x:
py -V
# Python 3.6.4
pip3 -V
# pip 9.0.1 from c:\program files (x86)\python36-32\lib\site-packages (python 3.6)

# OK, let's create a python project
cd C:\Users\yourname\projs-openfaas #or where ever you want your code
faas-cli new faas-py-test1 --lang python
# 2019/03/29 21:22:17 No templates found in current directory.
# 2019/03/29 21:22:17 Attempting to expand templates from https://github.com/openfaas/templates.git
# 2019/03/29 21:22:23 Fetched 15 template(s) : [csharp csharp-armhf dockerfile go go-armhf java8 node node-arm64 node-armhf php7 python python-armhf python3 python3-armhf ruby] from https://github.com/openfaas/templates.git
# Folder: faas-py-test1 created.
# Function created in folder: faas-py-test1
# Stack file written: faas-py-test1.yml

# So the files we have are
# |- faas-py-test1.yml    # Docker Stack file
# |- faas-py-test1
#     |- handler.py       # Py program
#     |- requirements.txt # Py dependencies
Tips about templates: * faas-cli/guide/TEMPLATE * faas-cli
Edit faas-py-test1.yml:
provider:
  name: openfaas
  gateway: http://127.0.0.1:8080
functions:
  faas-py-test1:
    lang: python
    handler: ./faas-py-test1
    image: rasor/faas-py-test1:v1 # edited! Added dockerhub userid/. Changed :latest to v1
Edit handler.py:
def handle(req):
    """handle a request to the function
    Args:
        req (str): request body
    """
    print("Hello! You said: " + req) # Added this line
    # return req # Removed this line
# So let's build!
faas-cli build -f ./faas-py-test1.yml
# [0] > Building faas-py-test1.
# Clearing temporary build folder: ./build/faas-py-test1/
# Preparing ./faas-py-test1/ ./build/faas-py-test1//function
# Building: rasor/faas-py-test1:v1 with python template. Please wait..
# Sending build context to Docker daemon  8.192kB
# Step 1/25 : FROM python:2.7-alpine
# ..............
# Step 22/25 : ENV fprocess="python index.py"
#  ---> Running in 597f759e3ecb
# Removing intermediate container 597f759e3ecb
#  ---> d5d5ec9ac47b
# Step 23/25 : EXPOSE 8080
#  ---> Running in 855b6cb3e7f2
# Removing intermediate container 855b6cb3e7f2
#  ---> fad6d57e56ab
# Step 24/25 : HEALTHCHECK --interval=3s CMD [ -e /tmp/.lock ] || exit 1
#  ---> Running in 0016df8d9c04
# Removing intermediate container 0016df8d9c04
#  ---> f39663c66ae2
# Step 25/25 : CMD ["fwatchdog"]
#  ---> Running in f301a88e4ebb
# Removing intermediate container f301a88e4ebb
#  ---> 4cf93e981b89
# Successfully built 4cf93e981b89
# Successfully tagged rasor/faas-py-test1:v1
# SECURITY WARNING: You are building a Docker image from Windows against a non-Windows Docker host. All files and directories added to build context will have '-rwxr-xr-x' permissions. It is recommended to double check and reset permissions for sensitive files and directories.
# Image: rasor/faas-py-test1:v1 built.
# [0] < Building faas-py-test1 done.
# [0] worker done.
The build created file Dockerfile.
Dockerfile contains the 25 build steps you see in the output. It builds the docker image.
Note: It also tells OpenFaaS how and where to start the function.
.\build\faas-py-test1\Dockerfile:
# ... Lines omitted
# Here OpenFaaS knows howto starts the program
ENV fprocess="python index.py"
# ... Lines omitted
# Verify img has been built
docker images
# REPOSITORY                     TAG                 IMAGE ID            CREATED             SIZE
# rasor/faas-py-test1            v1                  4cf93e981b89        14 minutes ago      65.8MB

# Push the img to docker hub for fast access
faas-cli push -f faas-py-test1.yml
# [0] > Pushing faas-py-test1 [rasor/faas-py-test1:v1].
# The push refers to repository [docker.io/rasor/faas-py-test1]
# 617c2e92f234: Pushed
# .......
# bcf2f368fe23: Mounted from library/python
# v1: digest: sha256:84991bc8eae01a7893b869e50758b7849482017f81334b3057289a283932a95a size: 3655
# [0] < Pushing faas-py-test1 [rasor/faas-py-test1:v1] done.
# [0] worker done.
Verify that the img has been uploaded:
# Time to Deploy
faas-cli deploy -f ./faas-py-test1.yml
# Deploying: faas-py-test1.
# WARNING! Communication is not secure, please consider using HTTPS. Letsencrypt.org offers free SSL/TLS certificates.
# Deployed. 202 Accepted.
# URL: http://127.0.0.1:8080/function/faas-py-test1

# Let's try to invoke it once more
echo "HiHoh" | faas-cli invoke faas-py-test1
# Hello! You said: "HiHoh"
Next steps
Next steps - Development
- OpenFaaS CLI Build with JSON input/output
- See Your first serverless Python function with OpenFaaS (Step 4 - Import 3rd party dependencies).
- Troubleshooting - OpenFaaS
- Async - OpenFaaS
Next steps - New tools
- OpenFaaS Dashboard
- HowTo setup Grafana as dashboard service in your cluster:
See book D4S chapter 4 (The OpenFaaS dashboard page 80).
- HowTo setup Grafana as dashboard service in your cluster:
- Turn Any CLI into a Function with OpenFaaS
Links
OpenFaaS
- How to build a Serverless Single Page App
- Deploy: openfaas/openfaas-cloud
- One-Click install on k8s cluster: openfaas-incubator/ofc-bootstrap - watch vid!
- Manual install: openfaas/openfaas-cloud
- Deploy docs: Deployment - OpenFaaS
- OpenFaaS on OpenShift - Red Hat OpenShift Blog
- Uses moby/buildkit
- Private image registry: Docker Registry
- docker-machine
- OpenFaaS
- openfaas/workshop
- My own blogs
Cloud IaaS container cluster hosts
- DigitalOcean - k8s manager node for free - you pay for cluster nodes only. Min $30/Month.
- AWS
- Azure
- GCP
- Deploying with Docker | Heroku Dev Center
More Links
- Docker Secrets in action: Github integration
- ngrok - secure introspectable tunnels to localhost - use it to expose you localhost to the internet, when testing.
- Turn Any CLI into a Function with OpenFaaS
Books
The End